

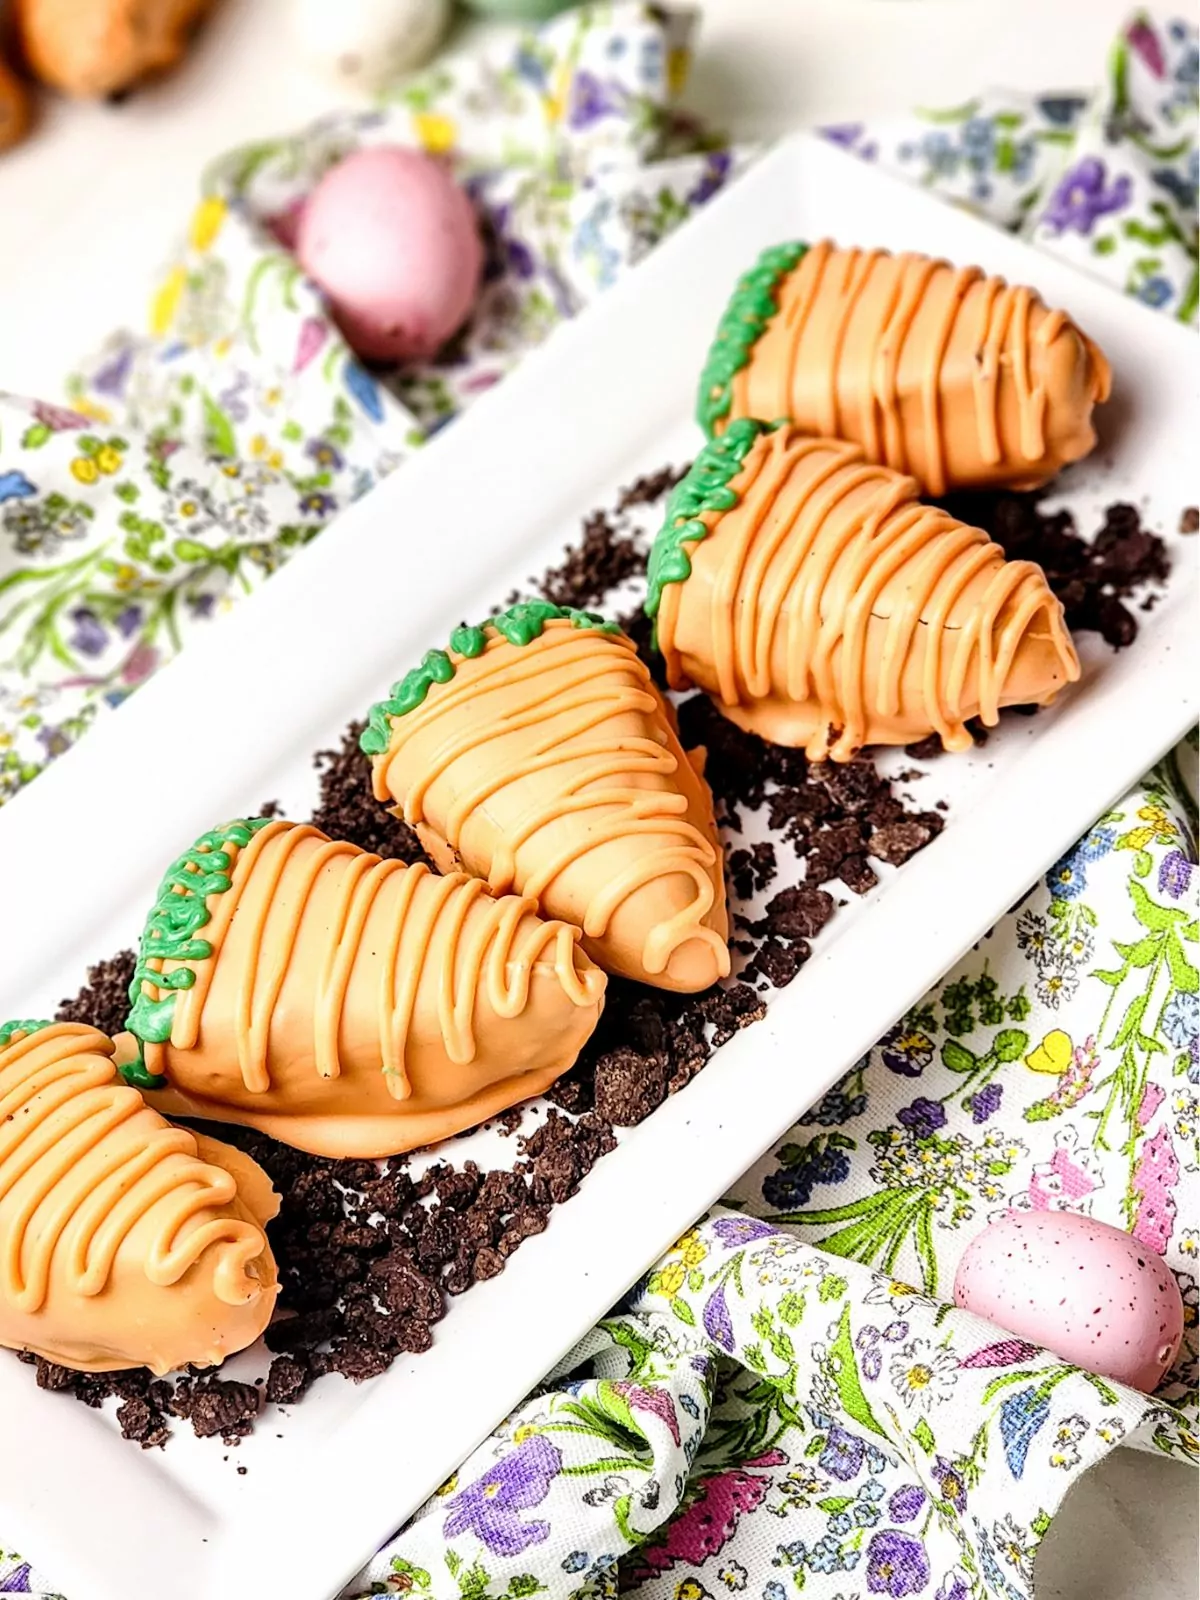
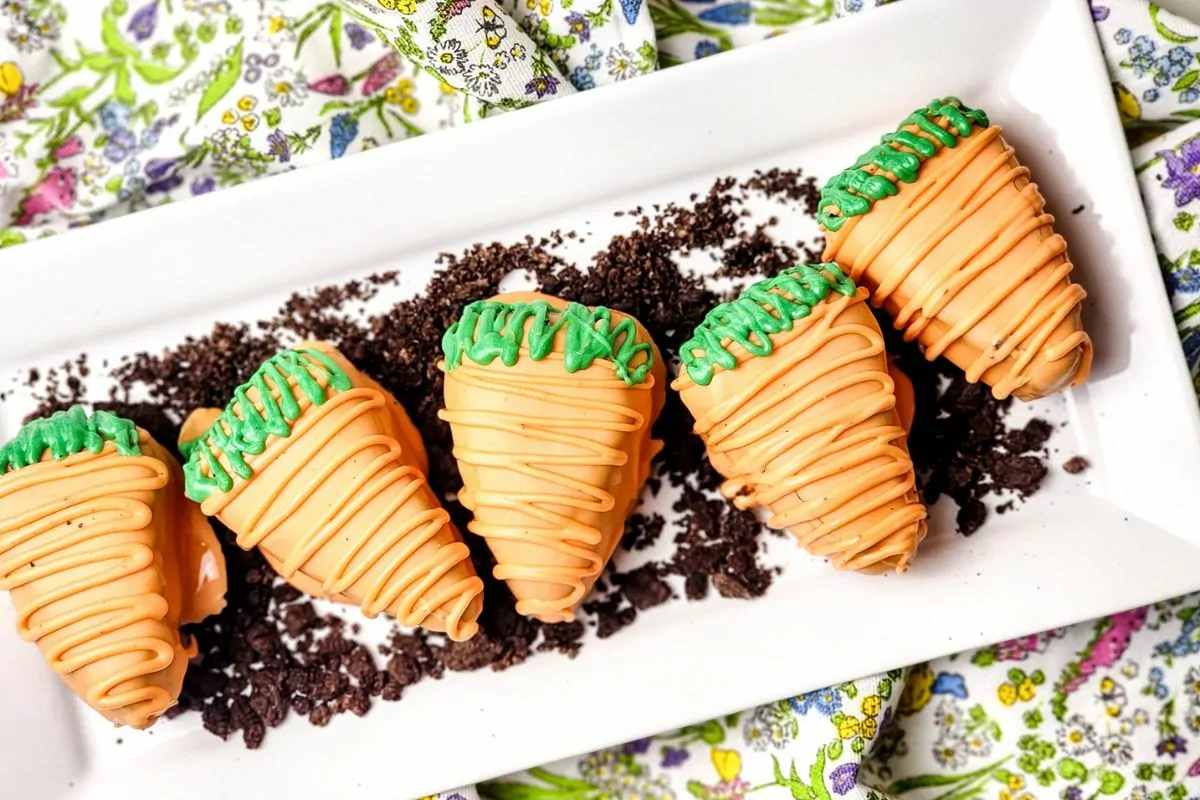
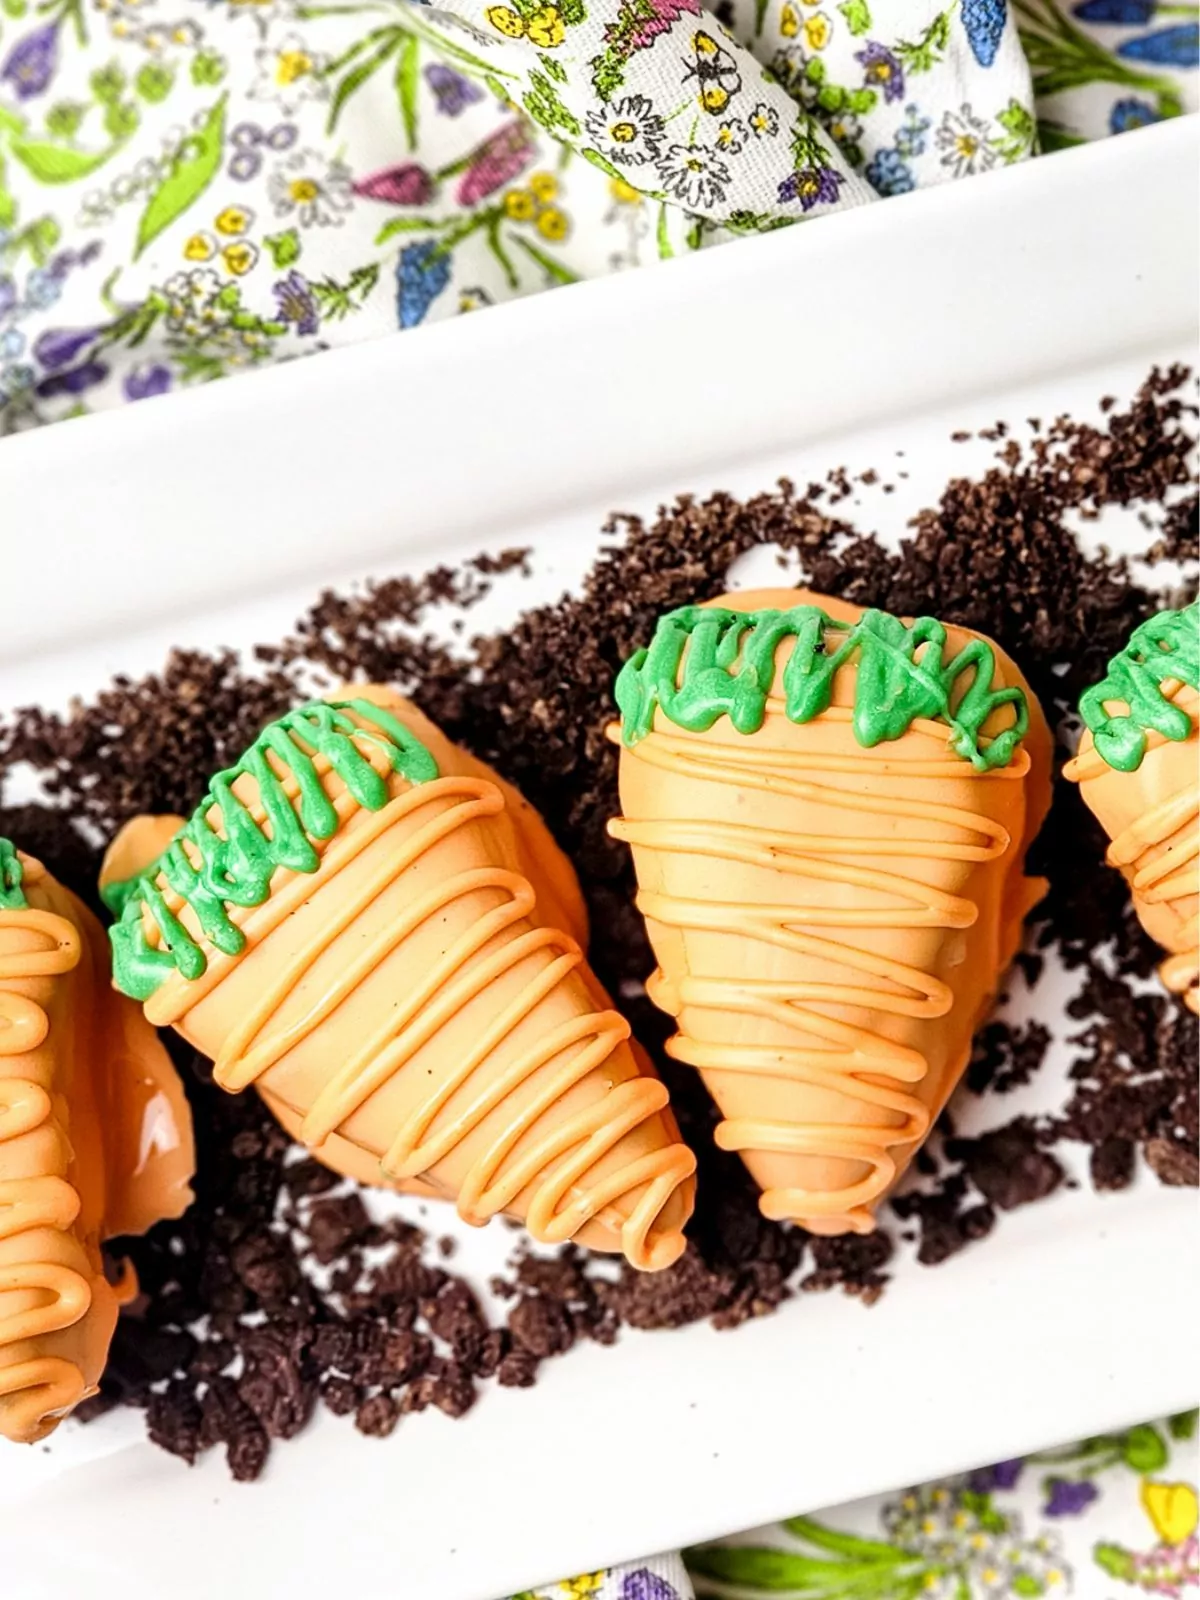
If you love chocolate desserts get ready for the ultimate springtime treat with this recipe for Easter Carrot Shaped Brownies!
Made with a simple boxed mix and melting candy, this recipe comes together pretty easily. I’ll show you step-by-step how to form the shape and decorate them to look just like carrots!
Check out all the other Easter Desserts for even more delicious recipes.
I love using shortcuts like boxed cake mixes and brownie mixes to create easy desserts.
Especially around the holidays and you have so many other dishes to juggle, a sweet treat made with a boxed mix can save time without sacrificing flavor.
Check out two of my favorite cake mix hacks with my Sheet Pan Brownies and my Peanut Butter Chocolate Chip Cake.

Check out the recipe inspiration!
Mini Easter Egg Cakes
Table of Contents
Why you’ll LOVE this dish:
Quick and Easy – Ready in about 30 minutes with minimal ingredients and effort.
Festive and Fun – A great way to make Easter desserts more exciting.
Kid-Friendly – Both the preparation and final product appeal to children.
Customizable – Can be decorated with different chocolates and toppings.
Budget-Friendly – Uses simple pantry ingredients without requiring special tools.
Check out my list…
Tools that will make your time easier and faster in the kitchen!
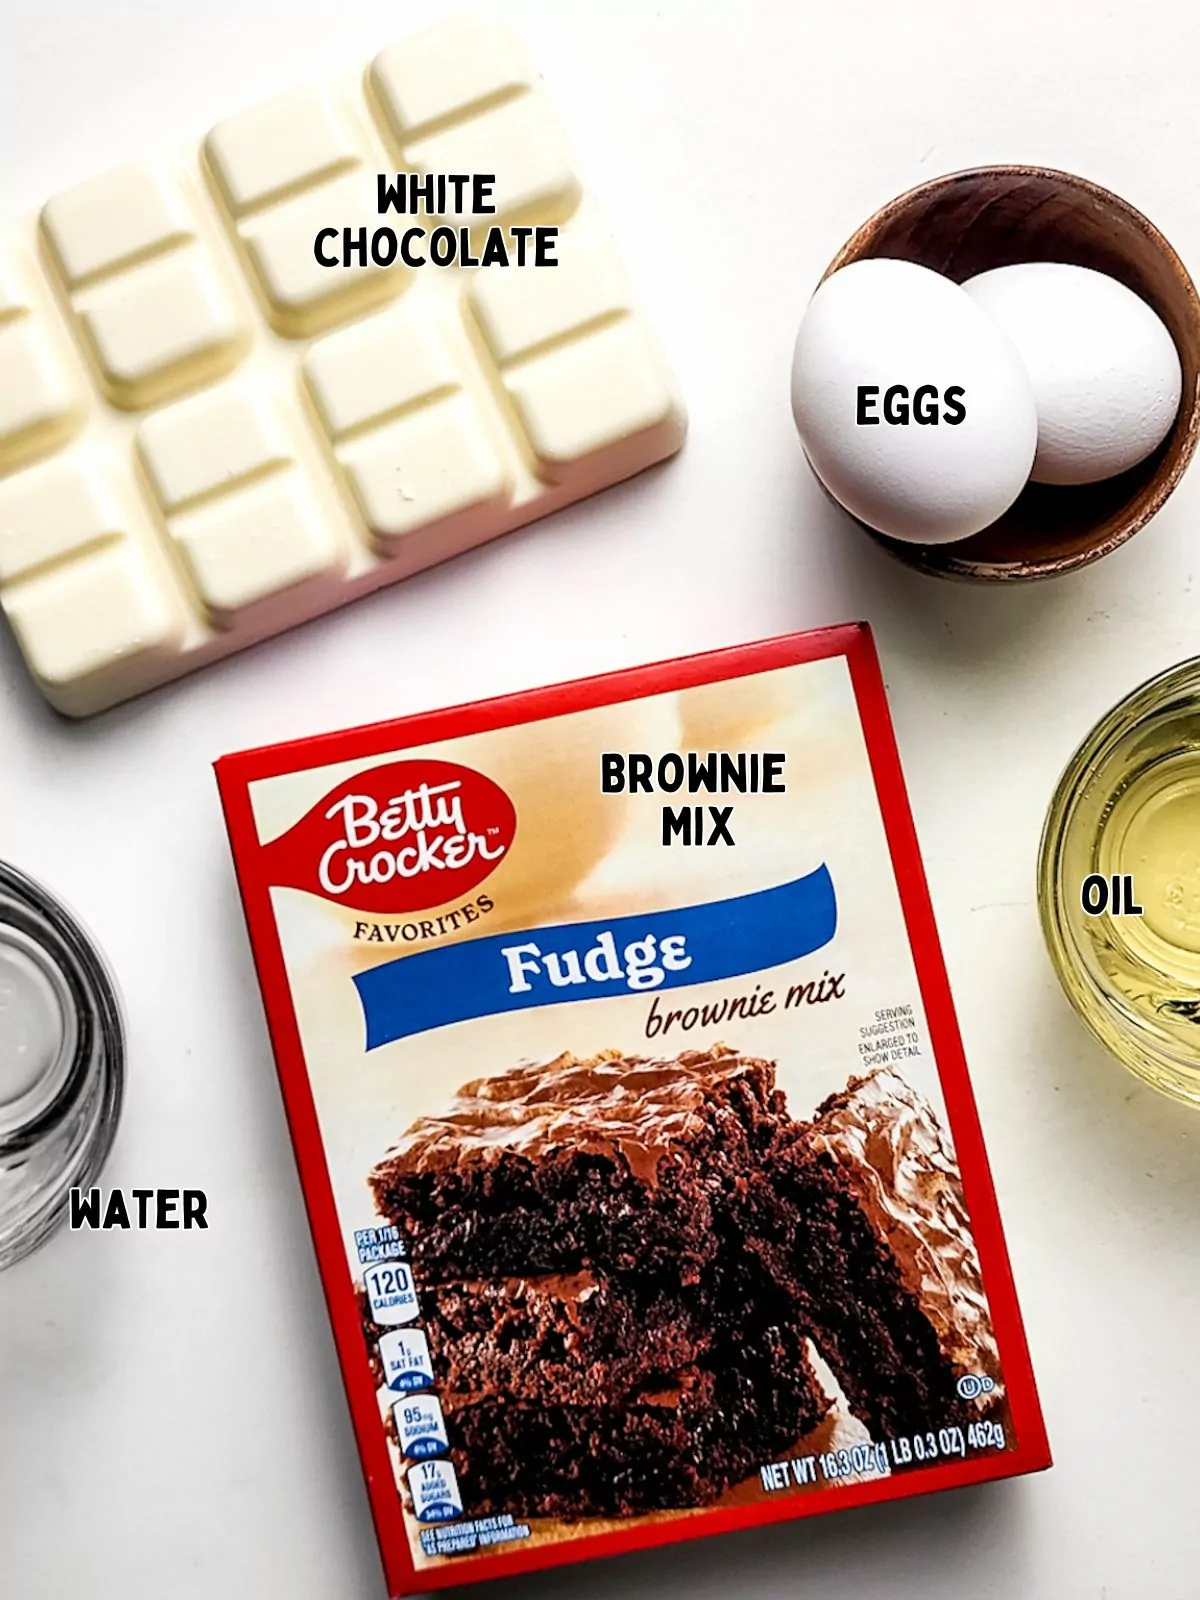
Main Ingredients Needed
Here’s a quick overview of the ingredients for this recipe. Find the exact amounts and click the Instacart button to easily add them to your cart – all in the printable recipe card below!
Substitutions and Variations
- Swap the box mix for homemade brownies if preferred.
- Don’t want to use food coloring? Try using Orange Candy Melts for the carrot and Green Candy Melts for the stem part.
- Instead of shaping the brownies into carrot shapes, use a carrot shaped cookie cutter!
- You can also use different holiday-themed cookie cutters.
This recipe has not been tested with other substitutions or variations. If you replace or add any ingredients, please let us know how it turned out in the comments below!
Step-by-Step Instructions
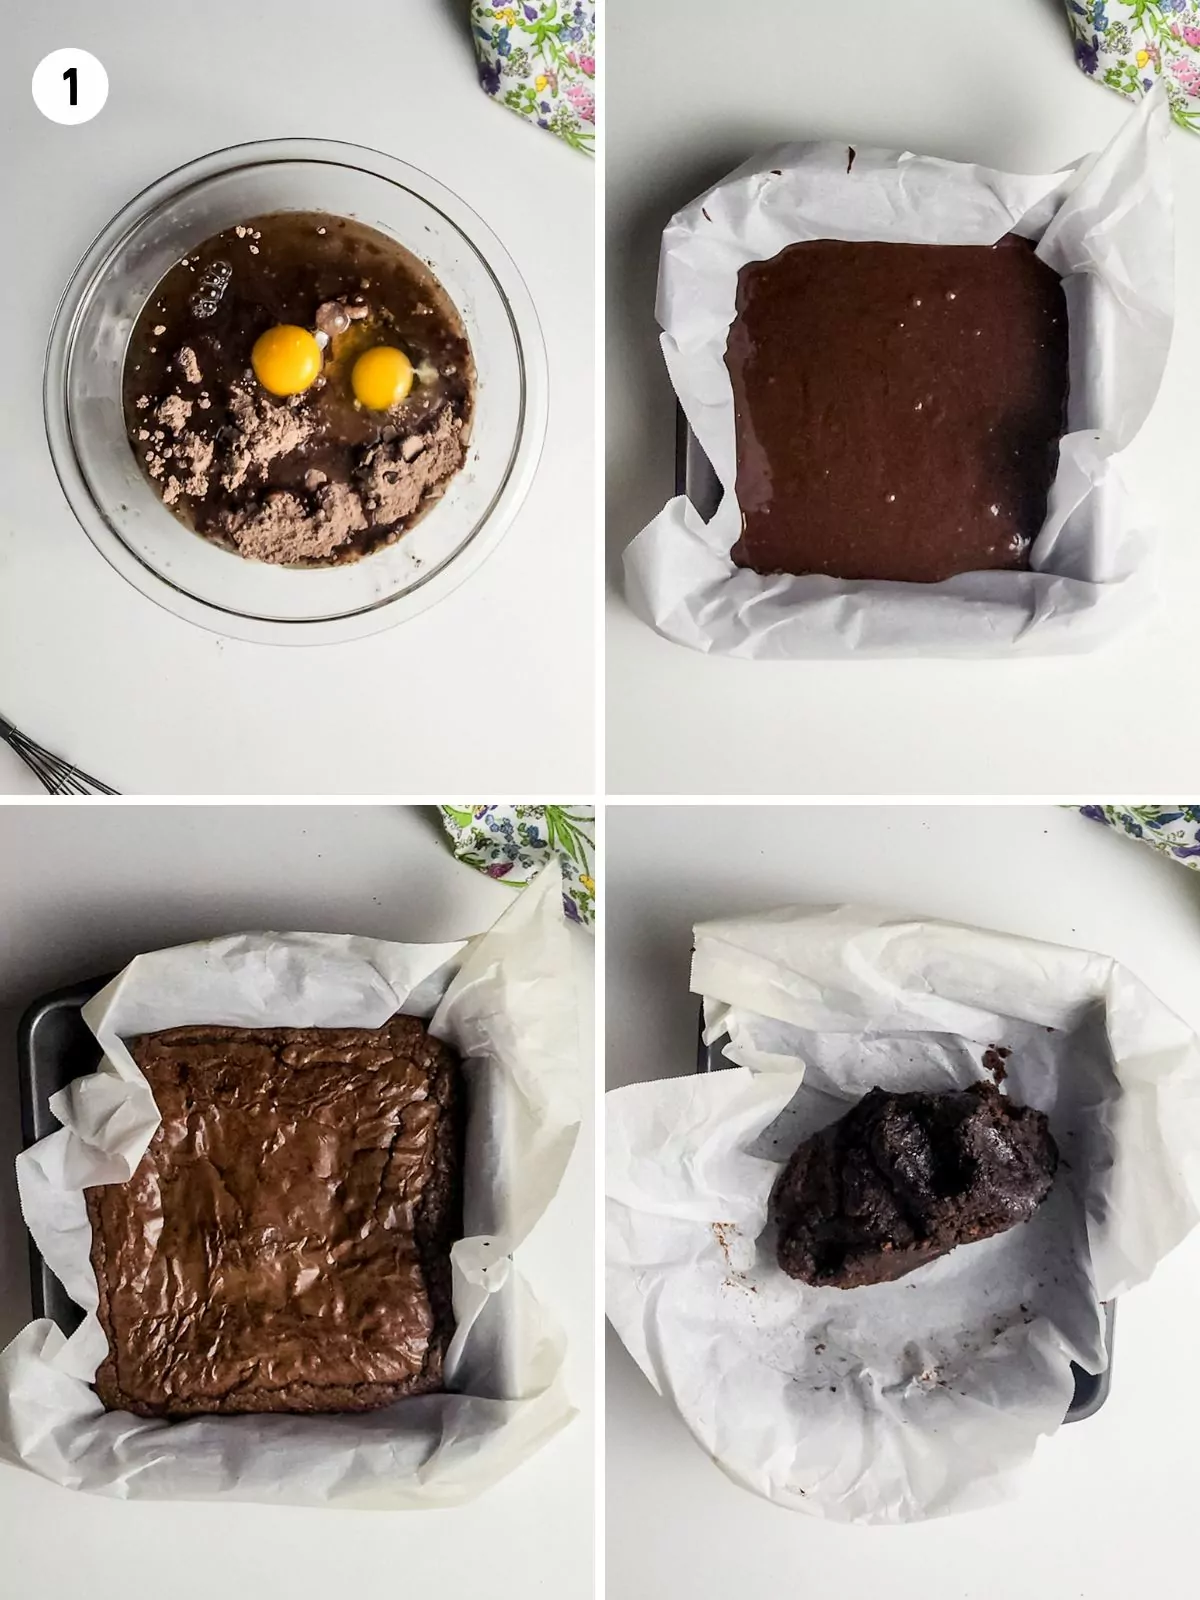
Step 1: Prepare the brownies according to the box instructions and bake in a parchment lined 8×8 inch baking pan. You’ll want them to be slightly underdone so the texture is right to shape into carrot shapes.
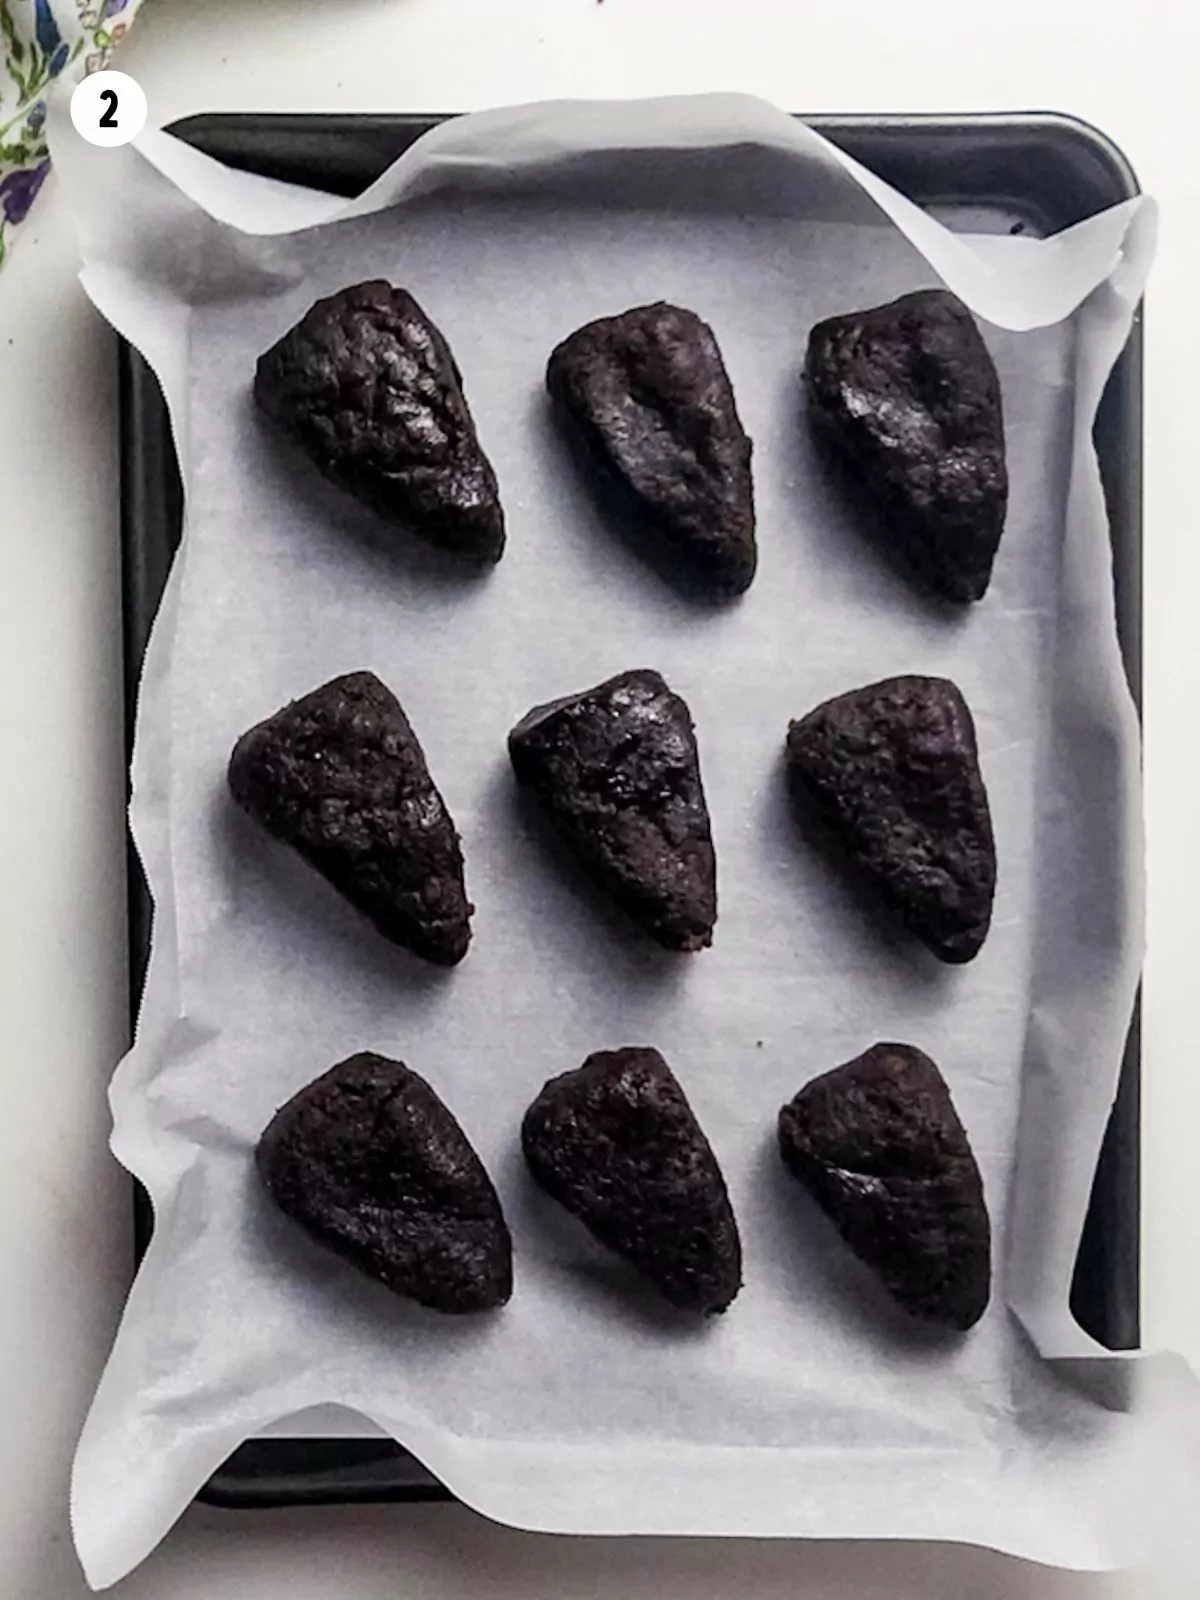
Step 2: Once the brownies have cooled, use a fork to press them into the texture of a cookie dough. Divide the brownies into 10 carrot shapes, and place on a baking sheet lined with parchment paper. Freeze for 20 minutes.
Quick Tip
For smooth, vibrant colored white chocolate, use oil-based, powdered, or gel food coloring.
If you find the colors are not blending well with the melted chocolate, you can try mixing in a little coconut or vegetable oil to keep it silky smooth!
Check out the Kitchen Tools Spotlight above for the food colorings used in this recipe.

Step 3: Put ¾ of the white chocolate in one bowl and the remaining ¼ in another bowl. Melt in 20 second intervals, stirring in between each interval until melted and smooth. Color the bowl with ¾ of the orange food coloring and the other green.
Baking Instructions
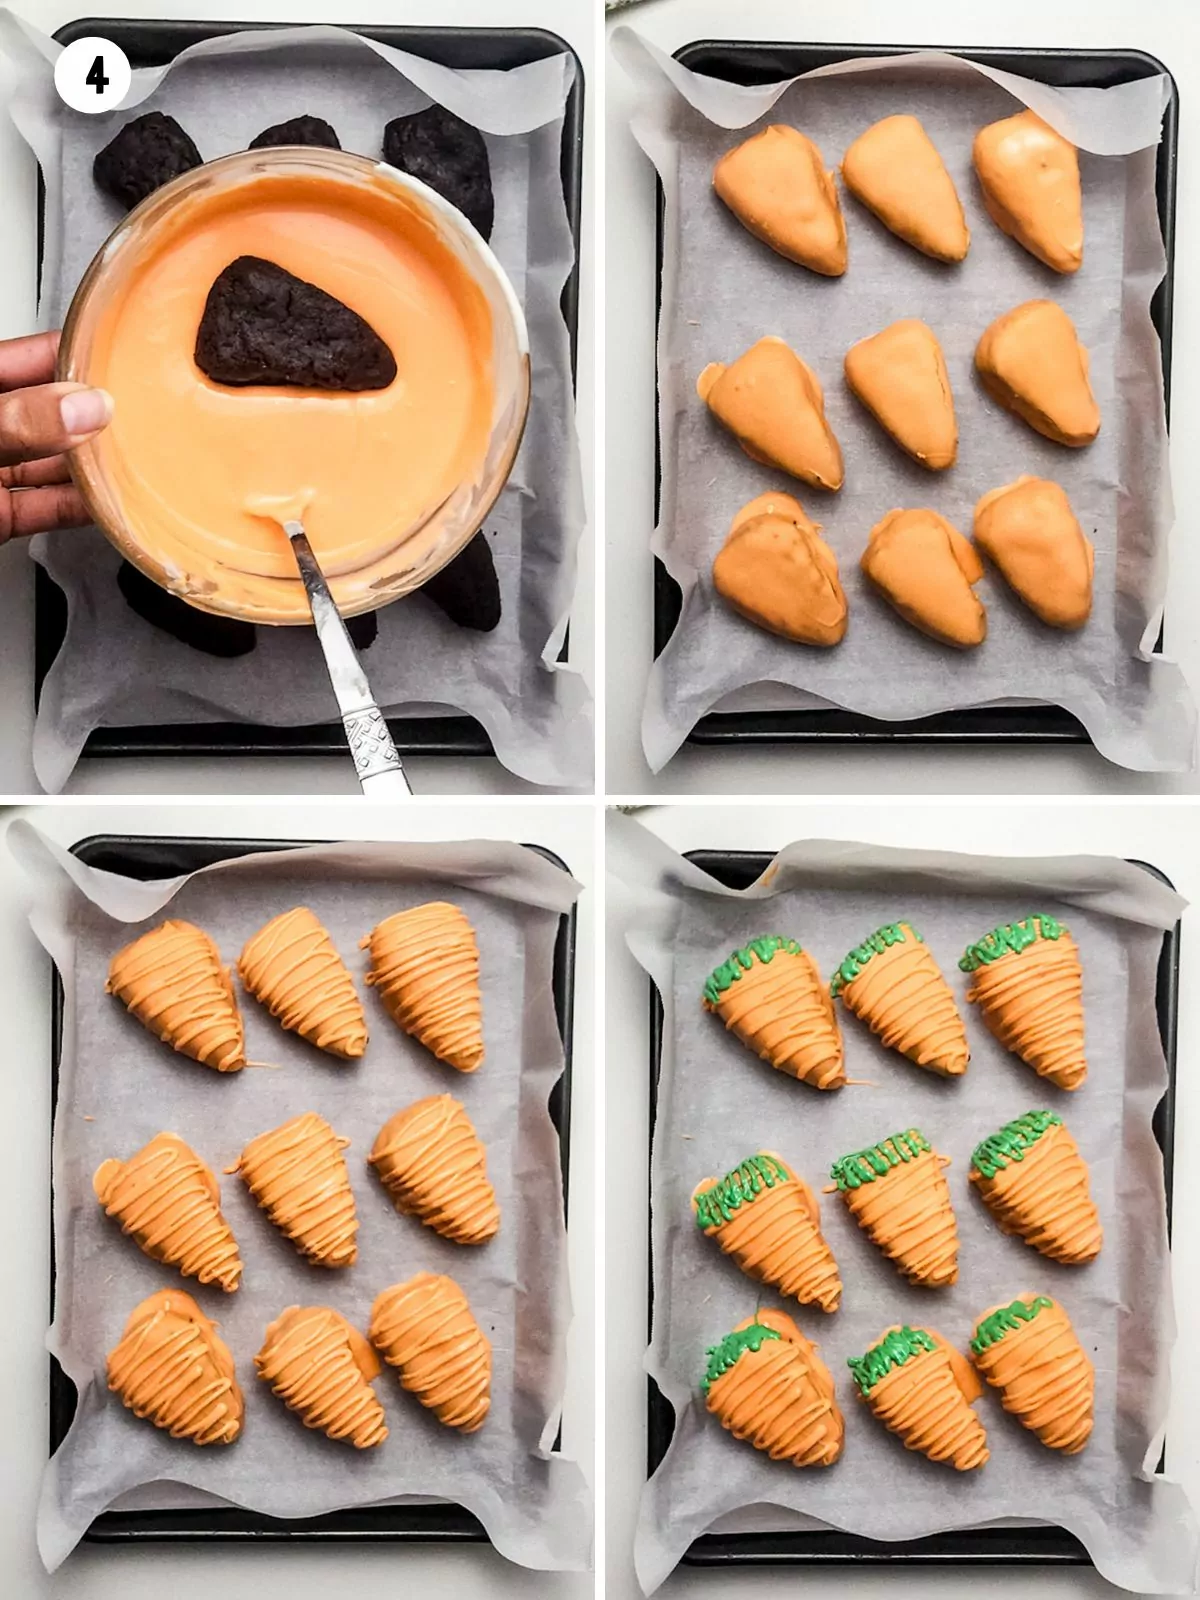
Step 4: Dip the carrot-shaped brownie into melted orange white chocolate, coating it completely. Place on a parchment-lined baking sheet to set. Once slightly firm, pipe green white chocolate leaves at the top and add decorative orange lines for texture. Let it fully set before enjoying.
Before You Begin!
If you give this a try, please leave a review and star rating! This helps my business thrive and continue providing FREE recipes.
Recipe FAQ’s
To view the answers, simply click on the down arrow (⬇) next to each question. If you have any other questions not answered here, please leave a comment!
Yes! You can absolutely use homemade brownies instead of a boxed mix. Just make sure they have a similar texture and thickness to what the recipe calls for. If your homemade brownies are extra fudgy, you may need to adjust the baking time or let them cool completely before assembling the dessert.
Yes, you can bake the brownies, form the carrot shapes and then freeze them until you’re ready to decorate. Make sure the brownies are completely defrosted before dipping in the melted chocolate or the excess moisture will cause the chocolate to seize.
How to Store and Freeze
Room Temperature: Keep in an airtight container at room temperature for up to three days.
Freezer: Freeze undecorated brownies in an airtight container for up to three months. Decorate after defrosting.
Thaw and Decorate: Allow the brownies to defrost overnight in the refrigerate. Decorate according to the steps above.
📖 Recipe Card
Want to Save This Recipe?
Enter your email & I’ll send it to your inbox. Plus, get great new recipes from me every week!
By submitting this form, you consent to receive emails from Walking on Sunshine Recipes.

Easter Carrot Shaped Brownies
Step-by-step instructions to make these Easter Carrot Shaped Brownies made with a box of brownie mix and green and orange melted chocolate.
Print
Pin
Rate
Servings: 10 servings
Calories: 123kcal
Ingredients
- 1 16.3 oz. fudge brownie box mix + ingredients on box
- 8 ounces white chocolate, melted
- orange food coloring
- green food coloring
Toggle on to prevent your screen from going dark
Instructions
Preheat your oven to 350°F and line an 8×8 baking dish with parchment paper.
Prepare the fudge brownie mix according to the package instructions, using the required ingredients (typically water, oil, and eggs). Mix well until smooth.
Pour the brownie batter into the prepared baking dish and spread it evenly.
Bake the brownies in the preheated oven for 25 minutes. Make sure they are slightly underdone, so they are the right texture to blend with a fork to shape into carrots. Once baked, remove from the oven and let them cool completely in the pan.
Once the brownies are cool, use a fork to blend the brownie until it forms into the texture of cookie dough.
Take pieces of the soft brownie and shape into carrots, placing on a baking sheet with parchment paper.
Once all the brownie dough has been used, place these in the freezer for 20 minutes.
While the brownies freeze, melt 8 ounces of white chocolate in a microwave-safe bowl in 20-second intervals, stirring in between, until fully melted and smooth.
How to Decorate
Divide the melted white chocolate into two bowls. In one bowl with ¾ of the melted white chocolate, add a few drops of orange food dye and stir until the chocolate reaches the desired shade of orange. In the second bowl with just ¼ of the melted white chocolate, add a few drops of green food dye and stir to make green chocolate.
Dip each carrot-shaped brownie into the orange white chocolate, covering the entire surface. Place the dipped brownies on a baking sheet lined with parchment paper to set.
Once the orange chocolate has set slightly, use a piping bag filled with the green white chocolate to pipe leaf designs at the top of each brownie to mimic the green leaves of a carrot.
For added design, use the remaining orange white chocolate to pipe lines or decorative details on the carrot shape for texture.
Allow the decorated brownies to cool and the chocolate to fully set before serving.
Notes
Room Temperature: Keep in an airtight container at room temperature for up to three days.
Freezer: Freeze undecorated brownies in an airtight container for up to three months. Decorate after defrosting.
Thaw and Decorate: Allow the brownies to defrost overnight in the refrigerate. Decorate according to the steps above.
Food Safety Tips
- Cook to a minimum temperature of 165 °F (74 °C)
- Do not use the same utensils on cooked food, that previously touched raw meat.
- Wash hands after touching raw meat.
- Don’t leave food sitting out at room temperature for extended periods.
- Never leave cooking food unattended.
- Use oils with high smoking point to avoid harmful compounds.
- Always have good ventilation when using a gas stove.


