I don’t plan to ever visit Iran. It sounds a bit dangerous. But I do love a lot of their food. Where I grew up in California, there was a large Iranian ex-pat population so I did get to try some amazing recipes often. Kebab koobikdeh is one of them and today I want to show you how to make it at home.

What is Kebab Koobideh?
Kebab Koobideh (pronounced koo-bee-deh) is a Persian minced meat kebab, usually made with lamb, beef, or a mixture of the two. The name “koobideh” comes from the Persian word koobidan, meaning “to pound” or “to beat,” referring to the traditional way of preparing the meat by pounding it with a mallet to achieve the perfect texture.
I suggest kneading the meat as it’s easier and does the same job.
Is this the only way to make Kebab Koobideh?
No. There are many recipes for kebab koobideh which you can make simply with just meat, salt, pepper can chopped onion. My recipe has a few more ingredients but the magic really lies in the way the meat is prepared, shaped and grilled.
I explain the traditional way to do all that in the recipe card below but here I have cooked my kebab koobideh using my Doori tandoor and kebab moulds. They we’re out of this world delicious!
Unlike many kebabs that use chunks of marinated meat, Koobideh is all about ground meat seasoned with onion, salt, and pepper. Some recipes, like mine, add turmeric, saffron, or sumac, but the core seasoning remains simple.
When cooked properly, Koobideh is smoky, juicy, and tender, with a hint of char from the grill. This recipe will show you can get the same amazing results using other equipment too.
Ingredients
Fresh ingredients are key to getting the best flavour from this kebab koobideh recipe. You’ll find the ingredients listed below, while the precise amounts are provided in the recipe card at the end of the page. For smooth cooking and the best outcome, it’s a good idea to have everything measured and prepared before you begin.

Instructions
Below, you’ll see step-by-step photographs to guide you through the recipe. At the bottom of the page, you’ll also find the full recipe card, which includes the complete list of ingredients and written instructions in an easy, printable format.

- Step 1: Finely grate the onions and place on a clean cloth

- Step 2: Squeeze out the excess liquid. This step is vital! Too much onion juice will weaken the meat mixture. You can use the onion juice to baste the meat at the end of cooking.

- Step 3: Combine all of the ingredients together except for the ghee/butter and onion juice which you will use later for basting.

- Step 4: Mix vigorously by hand for at least 10 minutes until the mixture is sticky and cohesive. This is what helps the kebabs cling to the skewers.

- Step 5: You can go straight to cooking or for best results, allow the meat to marinated in an airtight container for a few hours or over night

- Step 6: The traditional way to skewer the meat is to squeeze it on with your hand. This can be difficult for beginners. The skewer on the countertop was prepared using a kebab mould.

- Step 7: Using a kebab mould is a good way to form the kebabs on the skewer. Especially for beginners.

- Step 8: Just place the meat and skewer in the mould and press it down.

- Step 9: If cooking in a tandoor, it is a good idea to stick a potato at the end of the skewer to stop the meat from sliding off into the fire. This isn’t needed if cooking over coals on your barbecue.

- Step 10: Cook the kebabs for about 10 minutes or until cooked through. Be sure to baste them with melted ghee/butter and onion juice. This process is explained in detail in the recipe card below.

- Step 11: The smoky flavour from the charcoal is a real bonus and not to be missed.

- Step 12: When cooked through, transfer the kebabs to a clean surface to rest for a few minutes before serving.

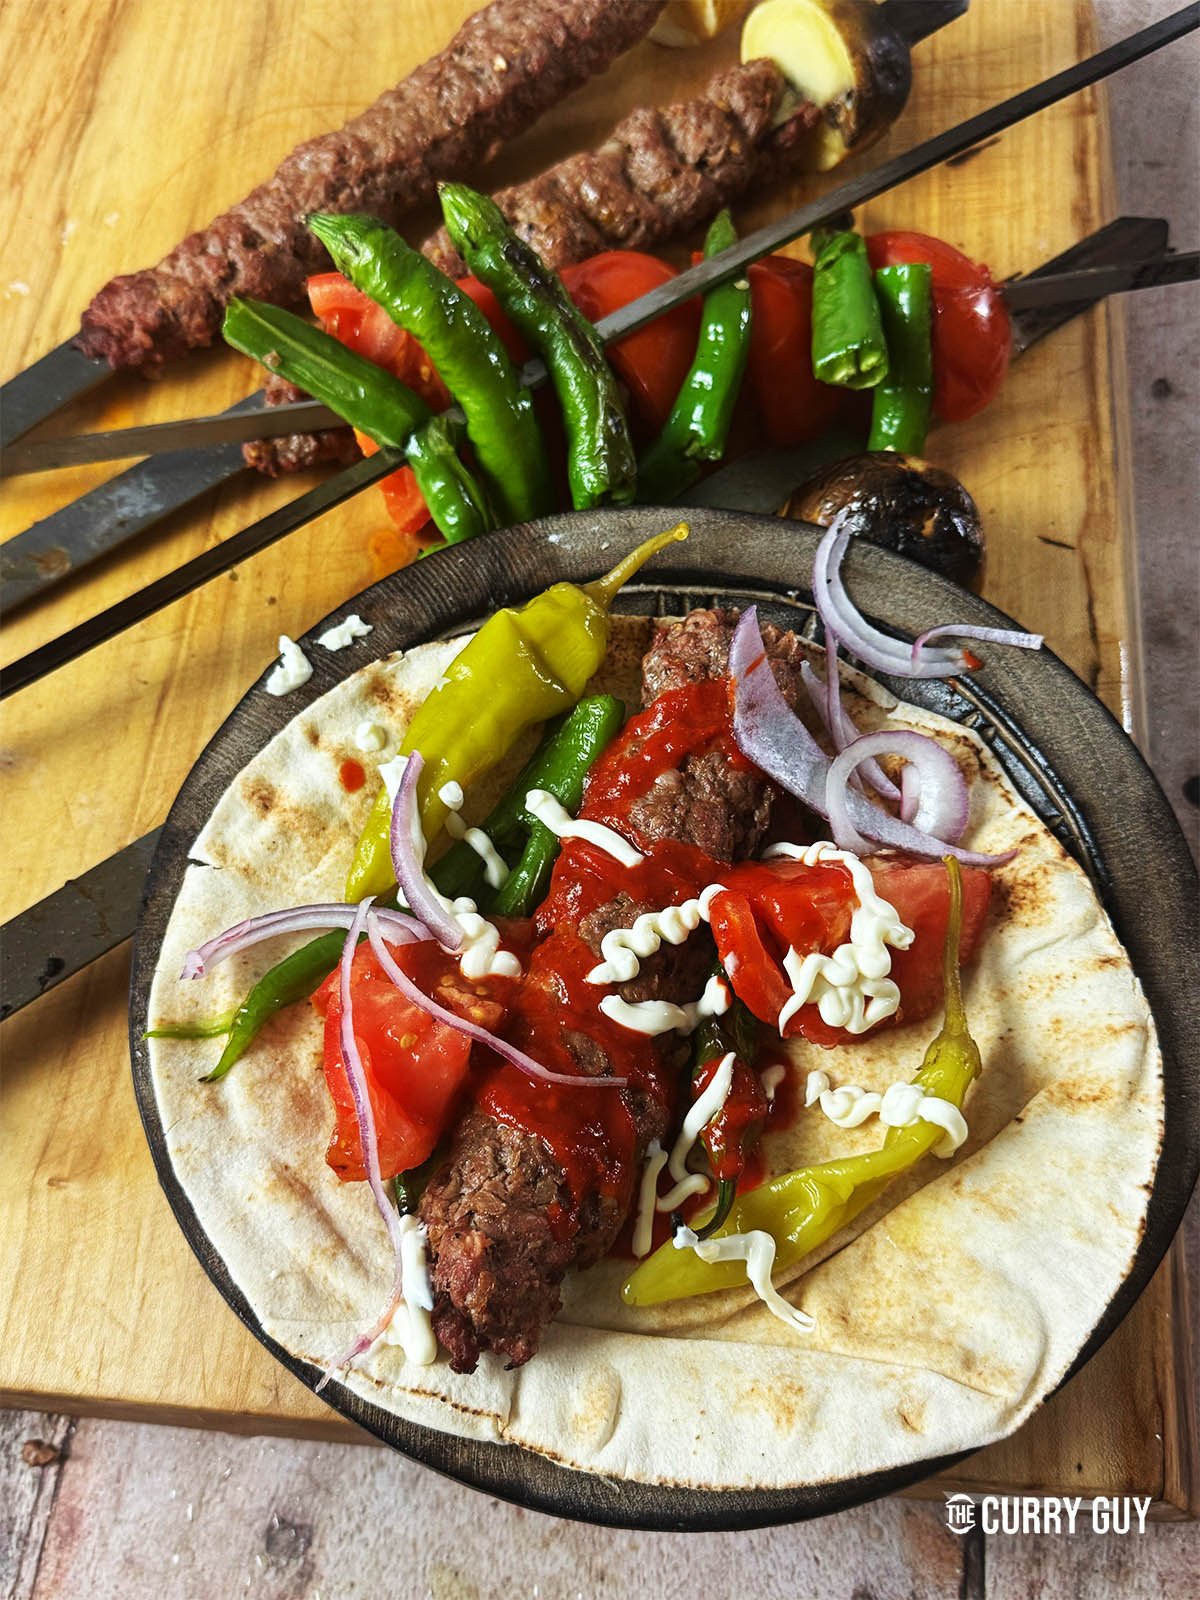
- Step 11: Serve with grilled tomatoes, chillies and saffron rice and/or flatbreads. Salad vegetables and sauces are also very good with the kebabs.
Variations
You are going to love these smoky, charred kebabs just as the recipe. Following are a few popular variations though.
- Simple: Season the meat with salt and pepper and mix in some chopped onion. This is kebab koobideh in its simplest form.
- Chicken: Try making kebab koobideh with chicken. When doing this, I recommend adding a few tablespoons of rendered lamb or beef fat to make them extra juicy.
- Oven or Stove: Although these kebabs are best cooked over fire, you could form the meat into sausage shapes and either fry them in a little oil over a medium-high heat or in an oven set to 200°C/400°F for 20 to 30 minutes or until cooked through.
Useful Equipment for Making Kebab Koobideh
While you can prepare and cook Kebab Koobideh in you kitchen, having the right equipment makes the process much smoother and ensures authenticity.
Wide Flat Skewers (Seekh):
Koobideh requires special skewers that are wider and flatter than standard skewers. They help hold the minced meat in place and prevent it from slipping off during grilling. If you use round skewers, the meat is more likely to fall apart, especially for beginners.
Grater or Food Processor:
Onion is a crucial ingredient in Koobideh. It needs to be finely grated (not chopped) to blend seamlessly with the meat. A box grater or food processor is perfect for this job.
Charcoal Grill (Manghal):
Traditionally, Kebab Koobideh is cooked over a charcoal grill, giving it its characteristic smoky flavour. I used my Doori Tandoor this time which worked amazing well. Gas grills or even oven broilers can be used but nothing matches the aroma of kebabs cooked over glowing coals.
Large Mixing Bowl or Meat Mallet:
If you want to go the traditional route, pounding the meat by hand with a mallet helps develop the sticky texture needed to keep the meat on the skewer. Otherwise, kneading vigorously in a mixing bowl works too. That’s what I recommend.
Serving Size (Serves 6)
This recipe is written for six portions, perfect for feeding a family or making sure there are leftovers ready for later. Fresh food takes a little effort, so why not get the reward of a second meal? If you need fewer servings, just halve the recipe, or scale it up. Adapt it to fit your needs.
Note: Nutritional information provided in the recipe card below is a rough guide only. Values can vary depending on the exact ingredients and quantities you use.
Storage and Reheating Kebab Koobideh
Like most kebabs, Kebab Koobideh is best enjoyed fresh off the grill. But if you’ve made too much (which is never a bad thing!), here’s how to store it:
Fridge:
Store cooked Kebab Koobideh in an airtight container in the fridge for up to 3 days. Make sure they’ve cooled completely before sealing to avoid condensation.
Freezing:
Wrap cooked kebabs individually in foil or cling film, then place in freezer bags. They’ll keep for up to 2 months. Raw Koobideh mixture can also be frozen, but it’s best shaped onto skewers after thawing.
Reheating:
Reheat gently in a covered pan over low heat, in the oven at 160°C (320°F), or on a grill for a quick re-char. Avoid microwaving as it can dry them out.
Pro Tips!
· Knead Until Sticky:
Don’t skimp on kneading. The more you mix, the stickier the meat becomes, which is essential for it to cling to the skewer.
· Squeeze the Onions:
Onion flavour is vital, but onion juice is your enemy. Squeeze hard and discard the liquid.
· Keep Hands Wet:
When shaping, dipping your hands in cold water helps prevent sticking and tearing.
· Hot Coals, Quick Cooking:
Koobideh is thin, so it needs intense direct heat for a short period. Don’t cook it low and slow or it will dry out.
· Serve Immediately:
Kebabs taste best when eaten straight from the grill. Prepare sides ahead of time so everything’s ready.
Top Tip
Use the Right Fat Ratio:
Fat is your friend. Around 20% to 25% fat ensures juiciness and binding. Too lean and your kebabs will fall off into the fire.
FAQ
Yes, you can shape the mixture into patties or sausages and grill them on a barbecue or pan. But for authenticity and presentation, I recommend getting a few wide, flat skewers.
You can, but you’ll miss out on the smoky flavour. If baking, place the skewers on a rack under the grill/broiler for a charred finish.
You can but keep it simple. My version uses more ingredients than required. Kebab koobideh is a simple kebab that relies on quality meat and that smoky, charred flavour.
Looking for other recipes like this? Try these:
Pairing
These are my favorite dishes to serve with [this recipe]:
Have you tried this recipe?
If yes, please give it a star rating in the recipe card below and leave a comment. I love receiving your feedback and I’m sure other readers of my blog do too. Thank you.
If you are not already doing so, please follow The Curry Guy on Instagram and Facebook for all my latest recipes.
Yield: 6
Kebab Koobideh
You can cook kebab koobidey in a tandoor oven, over hot coals on a barbecue, in your oven or a frying pan. This recipe is delicious however you decide to cook it!
Prep Time
15 minutes
Cook Time
15 minutes
Additional Time
30 minutes
Total Time
1 hour
Ingredients
- 450g (1 lb.) minced (ground) lamb
- 450g (1 lb.) minced (ground) beef
- 2 medium onions, grated
- 4 garlic cloves, minced or grated
- 1 tbsp pul biber
- 1 tsp sumac
- 1 tbsp dried red chilli flakes
- A pinch saffron
- 1 tbsp warm water
- 1 tbsp butter or ghee
- 2 tsp salt
- 2 tsp black pepper
Instructions
- Combine all of the ingredients together except for the ghee/butter and onion juice which you will use later for basting.
- Knead this meat mixture on a countertop for about 5 minutes to break the meat down so that it is finely minced.
- You can go straight to cooking or for best results, allow the meat to marinated in an airtight container for a few hours or over night.
- When ready to cook, light one charcoal lighter basket of charcoal and when it is going nicely, pour all the charcoal into your tandoor oven or barbecue.
- TO COOK IN A TANDOOR
- You want your tandoor to be as hot as you can get it. Ensure that you meat is cold from the fridge and squeeze it onto the skewers with your hand. For extra security, you can place a potato at the end of the skewer to save the kebab if it slides.
- Cook for about 10 minutes or until the kebab koobideh is cooked through and charred in places. Be sure to baste the kebabs with hot melted ghee/butter and onion juice a few times in the last minutes of cooking.
- When cooked to your liking, transfer the kebabs to a clean surface and let the stand for a few minutes before sliding off the skewers to serve.
- TO COOK ON YOUR BBQ
Ensure that you meat is cold from the fridge and squeeze it onto the skewers with your hand. Your coals are ready when it is uncomfortably hot to hold your hand two inches above cooking height for longer than two seconds. - Place the kebabs over the hot coals and allow to sear on the underside for a few minutes. Then flip the kebabs over to cook the other side.
- Continue turning until the meat is cooked through and charred in places. Be sure to baste the kebabs from time to time with the melted butter/ghee and onion juice.
- Transfer to a clean surface to rest for a few minutes before serving.
Recommended Products
As an Amazon Associate and member of other affiliate programs, I earn from qualifying purchases.
Nutrition Information:
Yield:
6
Serving Size:
1
Amount Per Serving:
Calories: 470Total Fat: 31gSaturated Fat: 13gTrans Fat: 1gUnsaturated Fat: 14gCholesterol: 146mgSodium: 953mgCarbohydrates: 5gFiber: 1gSugar: 2gProtein: 42g
SPECIAL OFFER FOR DOORI (Advert)
I know many of you have shown interest and even purchased new Doori tandoors after seeing my recipe posts.
If you are interested in picking up a new Doori, use the promo code THECURRYGUY when checking out and you will receive a 10% DISCOUNT and a free tandoor cover. NOTE: The Free Weather Cover will not appear on your order but you will receive it when you use the promo code THECURRYGUY.